


The most useful router table jig for Festool CMS router table
I have used my router a lot. In the beginning I had a cheap router, then I bought the Festool OF1010 router. After a while I bought a router table (Wolfcraft 540). Then I finally bought Festools CMS router module and the OF 1400 router. The Festool router table for the CMS is very good. Since I do own the Festool table saw module as well, I have a lot of Festool parts for the CMS. However, there is a router jig which is needed very often, not available from Festool, and which is very easy to solve yourself:
- You will most likely need an extra vertical fence on the router table for a lot of routing occasions (for example to route tenons)..
- The most important thing about this jig fence is that if you will need the fence at some time while you route the piece, it is best to add the jig before routing any part of that piece intended to have same router depth (with the same distance from the end of the piece).
How to add a vertical router fence onto Festool CMS
Creating and adding the extra vertical router table jig fence is as simple as it is useful. The fence is created just by cuttting a flat board with a straight side.
- The board in question ② can be created vary easily.
- Take a piece of MDF, and mount it onto the Festool CMS router fence with a couple of clamps ①.
- Then with the router turned on, slowly rase the router until the hole in the fence is as wanted ③
- With a board high enough, it is possible to have two heights of the hole created in the same fence, and then flipping it depending on what hole to use. This board has a much higher hole on the other side used when the router bit should take more material ④.
If you will route a lot of pieces, there is a risk you miss keeping the pressure onto the pieces to assure a good routed height. This is since the normal Festool featherboard can not work with a high router table fence like this. Thus using some kind of featherboard is a good idea.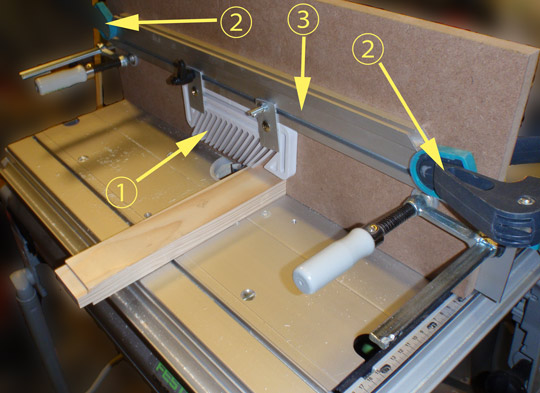
- Here I have used a plastic featherborad ①
- The featherboard is mounted onto the MDF using two additonal clamps ②
- The featherboard itself sits on the Festool angle stop ③. This is because I use it a lot also when cutting with the Festool table saw.
- Please note the routed piece on the table. It can be thought that when routing it as it is placed now, the extra vertical fence is not needed
Why you may need to add a vertical router table fence onto Festool CMS
The need for a vertical jig fence added onto Festool CMS arises when there is a risk that your routed piece could go in between the sliding fences, and the routing thus would affect parts of the piece where it is not intended to do so. This can happen if the Festool sliding fences need to be separated to allow for the router bit, and the piece routed is not wide enough to have a good support while passing the fences.

- The sliding fences ① and ② have been separated which creates a gap between them.
- This has been done since the router bit ③ is too wide and too close to the fence for them to stay more close together
- The fences are as wide apart as on the previous picture (there hidden by the vertical MDF fence). Tthe piece that is on the previous picture can be routed without the additional fence as long as the piece is lying down as it is on that picture
But the pieces routed at the vertical fence, shown here on the picture, have two easy and two tough sides to route. 
- The side routed with the piece lying down ① can be routed with the gap shown in the picture without using an additional vertical fence.
- But the side routed with the piece turned to stand up ② will be so narrow that it can be sucked in between the sliding fences, thus needing the additional vertical router fence
- All four sides need to be routed the same distance from the end of the piece. Thus the vertical fence is best mounted before routing any of the sides, assuring the setting of the distance remains the same.